The Advantages and Disadvantages of Asphalt Paving

Asphalt is a durable material that resists wear and tear. Its high angularity and stiffness make it withstand the pressure that motor vehicles apply.

Asphalt Paving

Asphalt mixes contain aggregate materials bonded with bitumen, a thick, viscous substance made from petroleum byproducts. The asphalt is mixed and heated at high temperatures, making it strong and long-lasting. Contact Asphalt Paving Philadelphia for professional help.

Asphalt is one of the most affordable paving materials and can be laid quickly. It is also highly resistant to various weather conditions, which helps minimize the need for costly repairs. In addition, maintenance is relatively easy, with routine sealcoating and filling in small cracks extending the lifespan of your driveway or parking lot.

Asphalt pavement is made from carefully combining aggregates like gravel, crushed rock, and sand with a black byproduct of petroleum known as bitumen. This is done in a special plant called an asphalt mixing facility. The mix is designed based on the project site’s climate.

The first step in preparing asphalt is to weigh the various components of the mix using a belt-weighing instrument. Then the mixture is preheated or dried at about 300 degrees. This is necessary to make the mix compactable and allow it to be transported to the paving site.

Once the asphalt is ready to be used, it is loaded into dump trucks and sent to the paving site. It must be kept hot at all times, as it cannot be transported when it has cooled. The temperature can be maintained by agitation in the load or by adding additives such as used frying oil, residue from corn stovers, and even treated swine manure.

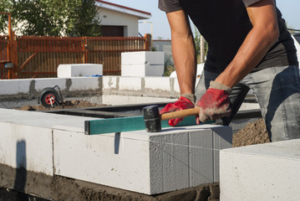
In addition to maintaining a high temperature, the asphalt needs to be sifted, graded, and mixed to achieve the desired consistency. Then it is compacted and rolled into place to create a strong, durable surface.

During this process, specialized tools are used to create the right texture and thickness of the asphalt for your driveway or parking lot. Professional equipment is faster and more precise than manual tools such as rakes or shovels. It is important to use quality tools, as the more accurate they are, the more efficient your contractor will be.

The dark color of asphalt absorbs sunlight and releases it slowly, which makes it up to 10 degrees warmer than concrete in the same condition. The warm surface can blister a person’s feet if they walk on it wearing flip-flops or other footwear with thin soles. This is why many people wear shoes when walking on an asphalt surface, and also why you should not walk your pets on the surface in the middle of the day during summer.

Durability

Asphalt paving is durable and is an excellent choice for parking lots, streets, and highways. However, it requires regular maintenance to keep it looking good and functioning properly. It can also be damaged by environmental factors, such as excessive traffic and weather conditions. These factors can shorten the life of an asphalt pavement and reduce its lifespan. The best way to prolong the life of your asphalt paving is to keep it clean and protected from UV rays. This can be done by using a cover or by laying darker asphalt. The darker asphalt will prevent the sun’s UV rays from penetrating as deeply into the surface, protecting it from damage.

The life of an asphalt pavement is influenced by many different factors, including its stiffness and resistance to distortion. It must also be flexible and strong enough to withstand the applied pressure of motor vehicles. This is why asphalt is typically used on roads and heavy-duty commercial properties.

When compared to concrete, asphalt is a much more durable material. It can withstand heavy loads and is less susceptible to cracking. It is also easier to repair and maintain than concrete. The process of laying and curing asphalt is also quicker and more cost-effective.

Another factor that influences the durability of an asphalt pavement is its fatigue time. This is determined by the properties of the asphalt, its temperature, and the number of load cycles it experiences. It is important to determine the fatigue limit of the pavement, as this will help in predicting its service life.

Generally, higher density specifications result in a longer service life for an asphalt pavement. However, achieving these high densities can be difficult for contractors because of the challenges of mixing and compaction. In addition, higher densities can increase the cost of an asphalt mixture.

A new method of testing asphalt binders has been developed to evaluate their dynamic stability and fatigue behavior. The technique uses a wheel-tracking test to determine the maximum displacement of the asphalt. This allows the researchers to compare the results of three different asphalt mixtures and to identify their relative performance. The results of the tests show that Superpave-20 has better dynamic stability than SMA-13 and ATB-25. This is because the asphalt binder in Superpave-20 contains more oil.

Noise

Asphalt pavements can produce a high pitched sound when cars drive over them. This is due to the vibration of the tires interacting with the road surface. However, it is easy to reduce the noise with a bit of preventative maintenance and regular sealing by asphalt paving professionals.

Noise is a common complaint from drivers, and it can be a serious issue for local governments. It can interfere with traffic and cause stress to people who live near the roads. To reduce noise, a new type of asphalt has been developed that is less noisy than traditional pavements. This innovative asphalt mix uses recycled materials and is made of porous aggregates, such as seashells. It also contains a low-carbon content and produces fewer fumes than other types of asphalt.

The acoustic properties of asphalt are related to the aggregates and the binders used in the mixture. Many State highway agencies have included acoustic performance as part of their design objectives. To achieve this, a variety of binder types and aggregates are used. Some agencies also restrict the use of recycled materials in order to meet acoustic requirements.

Other factors can influence the noise generated by the road surface, such as its texture, age, and smoothness. For example, roads with a negative texture (air voids between the surface aggregates) tend to be quieter than roads with positive textures. In addition, different vehicles and tyres generate different noises.

While asphalt is a great option for reducing road noise, it cannot be completely eliminated. The loudest noises are produced by heavy trucks and vehicles traveling at high speeds. In these cases, a sound barrier may be necessary.

The impact of an asphalt mixture’s acoustic properties on tire-road noise is often underestimated, as it is only one component of a complex interaction between the road and vehicle. However, the importance of this issue is increasingly recognized and should be incorporated into pavement design criteria.

A roadway’s acoustic properties can be measured using a close-proximity noise measurement technique called the On-Board Sound Intensity (OBSI) method. This measurement consists of directional microphones placed near the vehicle tires and road surface. OBSI has been compared to the more established Close Proximity Measurement (CPX) method, and both are sensitive to pavement characteristics.

Safety

Asphalt paving is a hazardous job. Workers are exposed to fumes, hot materials and heavy equipment. The risk of burns is high, and workers need to wear proper protective gear and be trained in how to safely use the paving equipment. In addition, they must be aware of the hazards associated with working on an interstate highway or near power lines.

Inhalation of asphalt fumes can cause a variety of health problems, including headache, skin rash and fatigue. It can also damage the lungs. In some cases, repeated exposure can lead to cancer of the lungs. To reduce exposure to asphalt fumes, workers should avoid smoking near the work area and wear respirators. The best respirators have a built-in filter to prevent the inhalation of dust particles from the pavement. The workers should also be trained to read the Safety Data Sheets (SDS) for the specific product they are using to understand its hazards.

The liquid asphalt used in paving is stored and transported at extremely high temperatures. If heated above its flash point, it can ignite and release fumes that can be flammable or explosive. It is important to ensure that the flash point of the asphalt is tested and measured, and that it is transferred in containers that are properly labeled and designed for the job. It is also recommended that the work be done in dry weather.

Asphalt can cause burns if it comes into contact with bare skin or if it is splashed onto the eyes. If the burned area is large, medical attention should be sought immediately. Inhalation of asphalt fumes can also cause headaches, dizziness and nausea. The workers should be trained in first aid and CPR.

How to Properly Prepare for a Concrete Installation

A successful concrete installation requires attention to detail. You want to ensure that the right tools are on hand and that crew members know how to use them.

Experts avoid pouring concrete during the summer and winter because rain and other weather events can oversaturate new concrete, causing delamination. This occurs when hollow spaces develop deep inside the concrete and are identified by tapping on the surface and hearing a thump. Visit Website to learn more.

concrete

Concrete is a ubiquitous building material with a wide range of applications. It is a cementitious mixture of coarse and fine aggregates, water, and sometimes admixtures. It is versatile, durable, and inexpensive, but it requires special care to prepare for installation. The success of any concrete project depends on a complex series of events that take place before the first drop is poured. Often, mistakes made in the process can be costly and frustrating. To avoid these mishaps, follow this guide to properly prepare for a concrete pour.

The first step is to clear the area where the concrete will be poured. Remove grass, rocks, shrubs, and old concrete, and dig the ground to the right depth. This will help reduce the chance of heaving later on, which is common in areas with expansive soils and frost. The site should also be levelled and tamped. Adding a layer of gravel and tamping it will prevent shifting and compacting of the concrete, which can cause cracks in the finished product.

Once the site is cleared, a form board will be put in place to indicate where and to what depth the concrete will be poured. To help make the process easier, it is a good idea to treat the form boards with light bodied petroleum oil, or shellac if using plywood. This will prevent the concrete from sticking and will promote easy form removal when the concrete is ready.

To make sure that the concrete is thick enough, it should be measured with a tape measure, and the dimensions should be marked on the form boards. The exact thickness required will depend on the load bearing capacity of the concrete. For example, a driveway that will support the weight of four vehicles needs to be much thicker than one intended for pedestrians.

To ensure that the concrete is placed and cured correctly, it is important to be aware of the weather forecast. The temperature, wind speed, and humidity all play a role in how long the concrete can be worked before it loses its workability. The contractor should also be aware that the type of concrete being poured will affect its workability as well.

Concrete is a versatile material used in construction for decades, but it takes the right tools and knowledge to work with. While many DIYers take on a project requiring concrete installation, it is important to hire a professional crew with the tools and skills required. From pouring a patio to building a sidewalk, concrete is a strong and durable material that can last a lifetime if it is properly installed and cared for.

One of the most critical steps in concrete installation is the mixing. While the basic recipe of concrete is simple with only four ingredients, there is a lot that goes into selecting the right mix for the job at hand. Civil engineers refer to this process as “mix design,” and it can make or break the strength, workability, finish and cost of the finished product.

Once the correct mix proportions are determined, it is time to start mixing. Depending on the volume of concrete required, this can be done either by hand or machine. Hand mixing involves placing the concrete ingredients on a flat surface and stirring them with hand tools. Machine mixing utilizes a concrete mixer, which can vary in size, shape and motor power. Whether a project requires a small batch or a large volume, the equipment must be carefully chosen to achieve the optimum results.

The process of transporting concrete from the mixing plant to the construction site must also be carefully managed. The goal is to keep the concrete from segregating while ensuring that it is still workable when it reaches its destination. If a concrete truck is used, agitating equipment will be used to prevent the concrete from becoming dense and compacted during transportation.

Once the concrete is poured, it must be consolidated to remove air voids and achieve a smooth surface. Concrete rakes are used to manipulate the concrete while it is in its early stages, and special screed boards can be run across the surface to create a finished look. It is important to work quickly because the concrete has only a short window of time in which it can be worked before it becomes too hard to shape.

Concrete is poured into formwork, or “molds,” to create a structure like a sidewalk, patio, driveway or road. The type of form used depends on the type of project. Formwork can be made of wood, steel or another material. A contractor will decide on the best type of form for a job and prepare it to hold concrete. Wood forms are commonly used for flatwork projects. Steel is often used for tall structures and highways.

Preparing the form for concrete takes time and preparation. The contractor must measure the height of the finished wall and mark the location of the form on the ground. He will then set stakes in the ground around the area to support the form. The stakes should be placed every two feet. Wood boards, typically 2x4s, are then nailed to the stakes to create the first side of the form. The contractor must make sure the board is straight and level before nailing it to a stake. He should then use a mason’s string to mark the line on the second side of the form, and repeat the process on both sides of the structure.

Insulated concrete forms, or ICFs, are a popular choice for building energy-efficient homes. These concrete walls feature foam insulation with a high R-value and are combined with concrete to provide a strong, durable structure. The concrete and foam provide thermal resistance and minimize air infiltration. ICFs are also easy to install plumbing and electrical conduit through the foam, as well as windows, doors and roofs.

Wooden forms have a tendency to stick to concrete, so the wooden planks are often coated with a low-grade oil or a specialized form release agent. This prevents the concrete from sticking to the wood and allows contractors to reuse the boards.

ICFs are also available in manufactured sections, or “gang forms,” that can be assembled on the ground and flown into place by crane to reduce construction time. Some of these forms can even offer rain-resistant technology to keep wet weather from impacting the pour or causing the concrete to fail when it sets.

Concrete is used in the foundation of most building projects, and it’s also frequently poured for basements, garages, driveways, flooring and other utility-based applications. Whether the concrete is being poured as a slab or to form a specific structure, there are several steps involved in the process that must be completed correctly to ensure proper curing and strength development.

The first step is to dig a hole and set the forms that will contain the concrete as it sets. The forms can be constructed from wood, plastic, or metal, depending on the project’s specifications. Reinforcement may be added to the concrete, such as rebar or wire mesh, which helps strengthen the concrete and prevent cracking.

Once the forms are in place, concrete can be poured. It’s important to use a high-quality concrete mix with the correct water-cement ratio to get the best results. Too much water can cause drying shrinkage and cracking, while too little will create concrete that’s difficult to work with (see Pouring Concrete in Cold Weather). It’s also important to pour the concrete on a day with a moderate temperature and no rain. Rain will ruin the appearance of the finished concrete and increase its tendency to crack (see Pouring Concrete in Rain).

After the concrete is poured, it’s important to level it quickly before it begins to set. This can be done by using a long plank of wood, such as a 2×4, to drag across the concrete surface. Once the concrete is leveled, it can be smoothed with a magnesium hand float, using long sweeping motions.

For a professional-looking finish, it’s important to add finishing products after the concrete has set. This can include staining, polishing, or painting the concrete to achieve a desired look and texture. If properly cured, these finishes can dramatically improve the lifespan of the concrete and enhance its beauty. These finishing products are available from many hardware and home improvement stores. They can also be purchased from online vendors specializing in construction supplies.

Home Deck Building – What You Need to Know

Deck Builders Lexington KY adds living space to a home and can be one of homeowners’ best investments. But it can also be one of the most dangerous additions to a home if built incorrectly.

Minimize wood-on-wood contact by leaving gaps between the ends of beams and joists. This allows moisture to escape and prevents the onset of rot.

deck builders

Home deck building is a great way to expand living space. It allows you to relax, entertain or play outside and it can increase your property value. It is also a much less disruptive project than adding an addition or renovating a room inside your home. The construction process is confined to the outdoors and can be done in a relatively short period of time, so you can get back to your normal life activities.

The first thing you need to determine is what your purpose for your new deck is going to be. Some people use their decks for dining and outdoor entertaining, while others prefer to relax or read on a comfortable lounge chair. The size and location of your deck is largely dependent on this and your budget. Once you know what you want your deck to be, you can start to plan the layout and add features like a hot tub or grilling station. You should also consider any shade options you may need to protect from the sun, such as an awning or pergola.

Another important factor to consider when planning your deck is the style and design of your house. Your deck should complement, rather than compete with your home architecture and it should flow with the surrounding landscape design. There are several different ways to approach this and it is a good idea to research ideas on the internet and by visiting local model homes to see what styles look best on certain types of houses.

Before you hire a contractor, ask about their experience and reputation. It is a good idea to request proof of licensing and insurance as well as a portfolio of similar work. It is also helpful to check references and consult with previous customers. A contractor with a lot of positive reviews is a safe bet.

Many municipalities require a building permit for decks and other structures. This is to ensure that the deck meets all building codes and safety requirements. It is important to get a permit before starting construction because any violations can result in expensive fines. It is also possible that if you build your deck without a permit, it could negatively impact the resale value of your home. Potential buyers might find out about it and request a permit before closing.

One of the first steps in home deck building is designing your layout. It’s essential that the design reflects your family’s lifestyle and complements your house. If a deck is too far removed from the house, it can feel like an add-on rather than an extension of the living space. A deck that’s a true reflection of the home will seem a natural part of the yard and won’t stand out like an afterthought.

Start by surveying the terrain where you want to build your deck. The elevation of the soil will determine how high your deck flooring must be. Then, figure out how large you want the deck to be. It’s important to keep in mind that the larger the deck is, the more it will cost to build.

You can use free online software to help you design your deck. Trex’s program is designed with their composite material in mind, but it will give you a good idea of the size and shape of your deck and what it might look like with different railing styles and colors. The software also provides a materials list and can point you in the direction of a local retailer or contractor who can make your dream deck a reality.

Having a clear understanding of how you’ll use your deck is a critical element in its design. Whether it’s for dining, relaxing or mingling with guests, the deck must be sized and designed to accommodate those activities. Adding separate areas for these purposes will allow you to comfortably seat people in groups without crowding them together or making them uncomfortable.

The type of deck you’ll end up with will depend on how much sun or shade you need and the level of privacy you desire. For example, a pergola will provide varying degrees of shade depending on how closely the rafters are spaced. You can also choose to shade the deck with a standard umbrella or an awning.

If you don’t have the time or expertise to do your own deck design, many contractors will offer this service for a nominal fee. Look for a company that specializes in decks and has a portfolio of previous projects.

There are many tools that are essential to building a home deck, whether it’s for cutting and shaping the materials or fastening them together. Some of these tools are designed to make a specific task easier and more efficient, while others are simply indispensable to having on hand for general use.

Among the most useful is a carpenter’s level, which allows you to check that your flat surfaces are perfectly straight and plumb. This is especially important for the framing, joists, and deck boards. It’s also a good idea to have several spirit levels on hand: six-foot models are great for determining deck height, while four- and two-footers come in handy for checking angles.

Shovels of various types are important for excavation and soil removal, particularly a spade shovel that has a flat-head to help break up and level ground, and a garden hoe for loosening compacted dirt. Posthole diggers, which are heavier and more powerful than handheld shovels, are useful for digging holes to the required depth for your deck’s footings.

You’ll also need a variety of power tools to do the actual construction. A circular saw can handle most basic cuts, but you’ll probably want a reciprocating saw (Sawzall) for anything too deep or difficult to cut with the circular saw, as well as a hand saw for finishing up any rough or uneven cuts. It’s also helpful to have a utility knife, and it may be necessary to add a wood chisel or plane to your tool collection for more detailed work.

Another handy tool is a rake, which is useful for sifting debris and soil to remove large stones or other materials that can interfere with proper footing preparation. It’s also handy for clearing off deck areas after they are complete and ready to be used.

Finally, a good supply of joist hangers, deck anchors, and exterior screws is a must for completing the base of your deck and securing it to your house. Joist hangers are metal brackets that support joists and connect them to the beams in your substructure. Deck anchors are heavy-duty metal brackets that hold your wood posts in concrete footings. Exterior screws are corrosion-resistant screws that secure your decking boards to the joists and post anchors.

A home deck is a great way to get some extra living space, and it can also increase the value of your house. But while it may seem like a good idea to try to build your own deck, it is important to realize that this is a project that requires a lot of expertise. It is best to hire a professional. This will ensure that your deck is built properly and safely. It will also save you time by allowing you to focus on other things while the professionals work.

When choosing a contractor, make sure they have experience building decks. This will give you peace of mind that they know what they are doing and can deliver on their promises. They should also be able to provide you with examples of their previous work. Finally, they should be able to provide you with a written contract or agreement before beginning the project. This will protect you in the event that there are any disputes or problems down the road.

Lastly, it is important to hire a contractor who has a good track record with other homeowners. It is important to ask for references and check online reviews to see what other homeowners have said about the company. A reputable company will have no problem providing you with these references.

When hiring a contractor, be sure to discuss the timeline for completion of the project. It is important to know how long you will be living in a construction zone, and it will help to have a set date for completion. It is also a good idea to ask the contractor about any potential problems or delays that they might encounter and how they would handle them.

Lastly, it is important to hire reputable contractors who are licensed and insured. This will protect you in the event of any accidents or injuries during the construction process. It is also a good idea to check with your local building department to see if there are any regulations or requirements that must be met before you begin construction.

Why Choose a Steel Building?

Steel is a great choice for large buildings that require strong, durable frames that are fire, mold, termite, and weather resistant. It’s also a very cost-effective option for construction.

Unlike wood framing, steel building components arrive at the job site ready to be erected. This greatly cuts down on construction time and saves money for the builder. For more information, you can visit on this link https://www.oksteelbuildings.com/.

Steel is one of the most robust building materials available. It can withstand high winds, strong storms, and other challenging circumstances that would cause damage to other structures. A steel building that looks after well can last over 30 years. It is also very flexible, making it easy to adjust as your needs change. This flexibility makes it a great choice for businesses that need to adapt over time.

Many metal buildings are made from galvanized or pre-galvanized steel, so the structural parts have been treated to protect them against rust and corrosion. This process is done during manufacturing and reduces the maintenance needed for the building. It can also save you money on your building project by eliminating the need for costly re-painting.

Because of the strength of steel, many manufacturers use pre-fabricated metal building panels to create the frame of a new building. These panels are welded together, creating a stronger structure than if the work was done on-site. This also saves on labor costs and helps to ensure that the building will be built to a high standard.

Another benefit of using a steel building is that it is resistant to moisture and pests. Unlike wood, steel is inorganic and will not rot or twist over time. It is also not susceptible to mold, mildew, or fungus. This can save you money in the long run by reducing the need for costly pesticides and repairs.

Steel buildings are also designed to withstand the stresses of earthquakes. While it is not likely that you will need a building in an area that experiences seismic activity, it is good to know that your steel building will hold up well if the region does experience a jolt. Steel buildings can flex underground stress while maintaining rigidity in high wind conditions.

The strength of a steel building allows for larger floor plans. With the ability to have open floor spaces, every seat in a restaurant can have a view. This can help to boost productivity and make customers feel more comfortable.

Steel buildings are an excellent choice for durable structures, including warehousing, retail spaces, and event centers. The material’s versatility enables designers to create visually appealing and highly functional buildings. They are also more durable than traditional building materials, such as wood and concrete, and require less upkeep.

The durability of a steel building results from the quality of the metal used and its protective coatings. These coatings are typically galvanized or painted to guard against corrosion, providing long-lasting strength and protection from harsh elements. In addition, steel is dimensionally stable so it won’t warp or bow over time. This durability is especially important in areas prone to extreme weather conditions, as it can help keep your business safe from damage caused by high winds and other storms.

Also, steel is an inorganic material and, therefore, resistant to mold and mildew. Steel is a good choice for commercial and industrial buildings that need to be free of these harmful organisms, as they can pose serious health risks to employees and customers.

Many different types of metal can be used to construct steel buildings, each with its strengths and benefits. For instance, aluminum and stainless steel are very durable and corrosion-resistant. However, the steel used in construction must be carefully chosen to ensure the building is safe and strong. Using steel that is of sufficient quality may weaken the structure or prevent it from failing.

Another type of durable steel is aluminized steel, which has been treated with a special coating to protect against corrosion and extreme temperatures. These coatings are very effective and can be used on various steel building designs. Aluminized steel can also be used to reinforce other materials in a building, making it stronger and more resilient.

Unlike other materials, steel buildings can resist severe environmental conditions like earthquakes and heavy rainstorms. They are also more fire-resistant than conventional building materials, which can rot or break under stress. Moreover, they are designed to control and manage damage, allowing normal business activity to resume quickly after an event.

Steel buildings are an energy-efficient construction choice. They use fewer materials during construction, allowing for less waste and higher efficiency during the manufacturing process. This, in turn, leads to lower construction costs. They also have a longer lifespan than other building types and can be used for decades without major repairs. They can withstand snowfall, strong winds, heavy rains, termites, fires, and other weather changes affecting traditional building structures.

Many steel buildings are designed with insulation to maximize energy efficiency. Insulation helps prevent hot and cold air from escaping your building, reducing the strain on your HVAC system and energy bills. Additionally, it keeps the temperature of your building stable and helps maintain a comfortable environment for occupants.

When choosing a company to build your steel structure, be sure to choose one with extensive experience in the industry. A company with a solid reputation for quality and customer service will likely provide you with the best value for your money. It is also important to consider the amount of time it will take for your structure to be completed, as this can significantly impact the project’s overall cost.

Another benefit of using steel is its resistance to corrosion and other weather-related problems. While wood buildings may require regular maintenance to protect them from insects, rust, and termite infestations, steel is more resistant. This means you will not have to worry about maintaining a pest control regimen for your building, saving time and money.

Steel buildings are also more flexible than those made of other materials. You can customize your interior layout easily and quickly because they don’t sag or warp like wood buildings. For example, you can add partition walls to separate rooms for different functions and use the space more functionally. Moreover, you can easily expand your building if needed.

Steel building frames are often lighter than those made of other materials, which allows them to be transported more easily and installed in the field. This saves on transportation and installation expenses, reducing the total construction cost. Furthermore, the shorter construction period allows builders to operate their buildings sooner, resulting in immediate revenue and reduced labor costs.

When constructing a steel building, the cost of materials and labor play a crucial role in its overall price. These factors are also influenced by the design and other features you add to your metal building. The size of the building also plays a role in the final price. A larger building will require more material and will cost more to construct.

Steel buildings are more energy-efficient than traditional construction materials and can reduce utility costs. They also have deep wall cavities, allowing for high-quality insulation. Additionally, they are constructed with precisely cut openings for doors, windows, and other components to minimize air leakage. Additionally, many pre-engineered steel buildings are designed with reflective paint finishes that reflect the sun’s rays to help keep interior temperatures down.

A steel building can withstand many weather conditions, including heavy snowfall, high winds, and tornadoes. Its durability and resiliency make it a good choice for storing equipment or a hobby shop. It is also non-combustible so that it won’t be damaged by lightning or fire. It can even withstand an earthquake without significant damage.

The cost of a steel building depends on its size, roof style, frame thickness (or gauge), and panel thickness. The cost of a building can also increase due to additional features, such as windows and insulation. However, the upfront cost of a steel building is usually less than that of a wood structure.

Metal buildings are a great option for commercial and industrial projects because of their affordability and versatility. They are quick to assemble and offer a wide variety of floor plans. They can be easily modified to accommodate changes in business operations. These buildings are also a safer option than traditional brick or concrete structures. They are resistant to termites, mold, and rust. They can also withstand earthquakes and wind storms.

Whether you’re building a steel garage or a warehouse, New York Steel Buildings offers a range of designs and colors to suit your needs. The company’s construction process is efficient, so you can be sure your project will be completed on time and within budget.

The Importance of Strong and Sturdy Dock Construction

Regardless of whether your boat dock will be used for mooring boats or as a recreational facility, some key principles should be considered during construction. Lake Wylie Dock Construction is strong and sturdy.

It should also be well-sheltered from winds and water currents. This can be achieved by replacing old stagnant water in rivers and seaports or by building walls and lee breakwaters in inland ports.

dock construction

The foundation of a dock is important for stability and strength. A good foundation will be strong enough to support heavy loads, resist corrosion, and stand up well against floods. The best foundation material is concrete, which has excellent durability, and is highly resistant to humidity, fire and termites. However, many people prefer a more natural look and opt for wood pilings. These are often treated before installation, which makes them more water-resistant. Wood can also withstand the weather well, but it requires regular maintenance to prevent rot and damage.

A dock can be used for a wide range of purposes, from providing a place to moor boats to offering a relaxing and beautiful view. Whatever purpose you have in mind, it’s important to plan the construction of the dock before constructing it. This will ensure that the design will serve its intended function well and that it will comply with any local ordinances or requirements.

The type, size and layout of a dock foundation will depend on the soil’s capacity and the force and weight the structure will be supporting. It’s recommended to hire a professional to perform a thorough soil assessment before beginning construction. This will ensure that the foundation is properly sized and reinforced to meet the needs of the structure and that it is located in an area that’s safe for the building materials and workers.

Another important consideration when preparing the foundation for a dock is to be sure that it’s built at least a few inches above the maximum waterline. This will ensure that the foundation remains dry and protect any equipment or property stored underneath. To determine the highest point of the waterline, you can check the water’s edge on a map or by looking at nearby natural rock outcroppings.

Lastly, it’s a good idea to install french drains around the perimeter of the foundation for additional protection from moisture. These are perforated PVC pipes that are buried in the ground, and they help to collect and divert excess rainwater away from the foundation. This will also protect the structure from flooding and erosion and minimize the risk of contamination of the soil and surrounding environment.

The material a dock is built from should be strong enough to hold vessels when moored and stable in windy or wavy conditions. Depending on the purpose of the dock, it may also need to be waterproof or at least water-resistant. Wood, concrete and steel are all good choices for the frame and outer posts of a dock, with cedar being the preferred choice because of its rot-resistant properties.

When building the frame of a dock, it’s important to follow all applicable construction codes and guidelines. Taking shortcuts or cutting corners at this stage of the construction process can cost you in the long run. Taking the time to do things right will ensure that your dock is safe and durable for years to come.

The design of a dock should take into account the amount of traffic it will need to handle. Larger docks can have a central entrance channel to facilitate traffic movement. For smaller docks, the entrance channel can be designed to resemble a natural waterway or be enclosed within a structure. Some docks are naturally sheltered from winds and waves, but most have to be provided with man-made sheltering structures such as walls or lee breakwaters.

Another consideration is how high the dock will be. It’s important to keep in mind that the height of the water can change and fluctuate over the course of a year. The best practice is to build the dock at the maximum water level of the lake or river in which it will be located. This will allow the dock to be used for the most possible amount of time, especially during dry seasons.

For this reason, many commercial docks are constructed using steel pilings rather than wood. While steel is the sturdiest option, it can be difficult to work with as it’s very heavy. When constructing a steel dock, the use of blind bolt anchors is very important. These anchors are fastened to aluminum brackets that are then welded to the steel pile.

While some people build their own docks, it’s best to leave the construction of a larger commercial or community-owned dock to professionals. The skills and experience of a professional marine contractor can ensure that the finished product is strong, durable, and compliant with all local rules and regulations. In addition, they can help you with any unforeseen issues that might arise during the construction process.

Once the basic frame is constructed and the footers and outer posts are in place, decking materials can be installed. Like any other decking project, this is done in a similar fashion, with the material being cut to fit and then secured to the frame using screws or nails. Once the decking is in place, it’s important to add any additional shoreline support posts to avoid structural collapse.

The type of material used for dock planking is also a big decision, as it determines how long your new dock will last and what kind of use you can get out of it. Wood, for example, is a classic option that looks great and works well in most settings. However, it carries the risk of mildew and mold growth as it is a natural material that is directly exposed to water. This is why many homeowners opt for composite or plastic decking, as these materials are much more resistant to moisture.

Another popular option for dock planking is stainless steel, as it is strong enough to withstand the impact of heavy boat traffic and day-to-day wear and tear. It’s also extremely durable and requires little maintenance as it is naturally protected against corrosion. It is also incredibly stable due to its density, which means that it doesn’t shift or move easily even in windy and wavy conditions. Steel is the preferred material for commercial docks and those built by the marine industry, as it’s very difficult to damage or destroy. When it comes to installing this material, blind bolts play a critical role.

One final note about dock construction: unlike building a shed or renovating your bathroom, working on structures over water bodies is highly regulated by local authorities and requires a permit. Obtaining this permit ensures that you’re following all of the rules and regulations in order to keep your dock safe, secure and up to code.

, our professional crews receive extensive training from our master craftsman trainers in both classroom and hands-on situations. Combined with our apprenticeship programs, this specialized training translates into unmatched productivity for our clients.

If a dock is not properly anchored, it can become unsteady and possibly fall off the water’s surface. It can also be dangerous for anyone who uses it and could potentially cause damage to boats and the shoreline. offers a variety of anchoring options to ensure your dock is secure in any body of water. The type of anchoring method needed will depend on the conditions where your dock is located. For example, if you’re building on the ocean, it will have to contend with larger waves and more drastic water fluctuations than a lake. Areas prone to hurricanes may also require additional hurricane holes and/or a system with multiple cable applications.

The four most common dock anchoring methods include sleeve anchoring, pile anchoring, pole and sleeve anchoring, and cable anchoring. Pile anchors are ideal for docks that must be strong and stable to handle heavy loads. They can be used on wood, concrete or steel pilings.

A sleeve anchor is best for windy areas that can experience high waves. These anchors have durable vertical galvanized steel sleeves attached to the dock, with long, galvanized poles running through them and into the lake bed. A winch or cable system is typically connected to the bottom of each pole to help move and adjust to changing weather conditions.

Stiff arm anchors are good for near-shore docks that must transport heavy loads or hold a lot of people. These systems use a winch or cable with reinforced arms to connect the dock and the shoreline.

For floating docks, a series of crisscrossed chain anchors are recommended. The chains are connected with a quick chain link to a rebar anchor that is set in the lake floor. These anchors can be made from a wide variety of materials, including concrete, steel, or fiberglass.

In addition to anchors, you will need galvanized chain and eye bolts to attach the chains to the anchors. These fasteners are designed to help withstand the pressure from waves, and can be secured with a chain swivel or a cleat.